 This post contains affiliate links for your convenience (which means if you make a purchase after clicking a link I will earn a small commission but it won’t cost you a penny more)! Read my full disclosure policy.
HERE’S WHAT YOU NEED
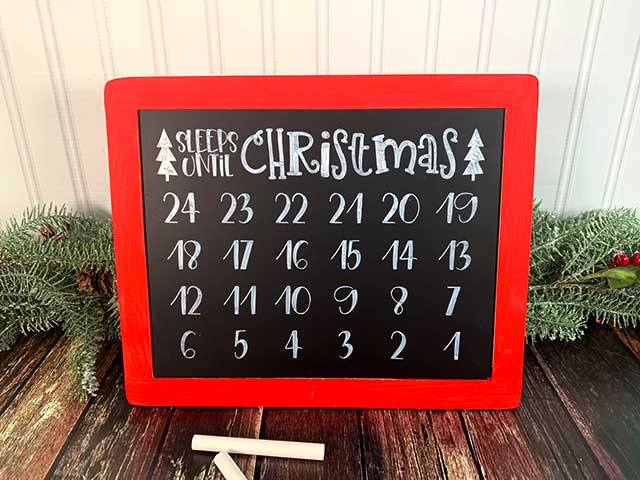
- Chalkboard Sign (Mine is 10.5″ x 9.5″ and I painted the frame red)
- Vinyl (Color doesn’t matter)
- Transfer Tape
- Application Tool
- Liquid Chalk Marker
- Chalk
- Electronic cutter (cricut explore, silhouette or other cutter)
- Cut File (available for free in my resource library)
HERE’S WHAT YOU DO
STEP 1: DOWNLOAD THE FREE SVG FILE
The first thing you’ll need to do is get the free SVG file you’ll use for this project. I keep all the SVG files I use for the projects I make in my SVG Library. These SVG files work with Cricut and Silhouette machines, as well as many others. This library is open to everyone and is free! You can access the library here. Look for the file called Sleeps until Christmas. It will be listed under the Christmas category-25 Days of Craftmas 2019 – Day 2.
STEP 2: CUT AND TAPE VINYL STENCIL
Start by measuring your chalkboard to determine what size you’ll make the design. Import the design into your cutting software and size accordingly. Add a rectangle around the design to create a stencil.
Do you need more help with creating a vinyl stencil? Check out these posts.
How to Make a Vinyl in Cricut Design Space.
How to Make a Vinyl Stencil in Silhouette Studio
Cut out the design and weed away the excess vinyl.

Cut a piece of transfer tape just a little large than your design. Place it over the vinyl and rub over the design with an application tool to help the vinyl stick to the transfer tape. Then, trim off the excess transfer tape. Rub over the entire design with a scraper
![]()
Remove the vinyl backing. I like to flip over the design and pull the backing away from the vinyl. This way, the vinyl doesn’t curl.

STEP 4: APPLY VINYL STENCIL TO CHALKBOARD
Place the vinyl stencil on the chalkboard. Match up the straight edge of the stencil with the straight edges of the sign. Rub over the vinyl with the scraper.

Carefully remove the transfer tape.
![]()
Rub over the design one more time with the scraper.

STEP 5: FILL IN THE STENCIL WITH PAINT
Fill in the stencil with a liquid chalk marker. I love these chalk markers because they look a lot like chalk but they’re semi-permanent. You can get it off, but it takes a bit of work. So, it’s perfect for this sign because the kiddos can use regular chalk to cross out the numbers and the liquid chalk shouldn’t come off when you erase.
I filled in my stencil by tracing around the outline of the number or letter and then I went back and filled in the middle.

Once you’ve filled in the entire stencil, let everything dry for 5 or 10 minutes. Once it’s dry, pull off the vinyl stencil.

Use a weeding tool to pull out the centers of the letters and numbers.

That’s it! Isn’t that a fun sign? I’m planning on making several of these so each of the littles can have their own!
Did you enjoy this post? Help spread the word! Share this post on your favorite Pinterest board. Thanks!

Want to make your own? Get the free cut file for this project in the resource library
Thank you!