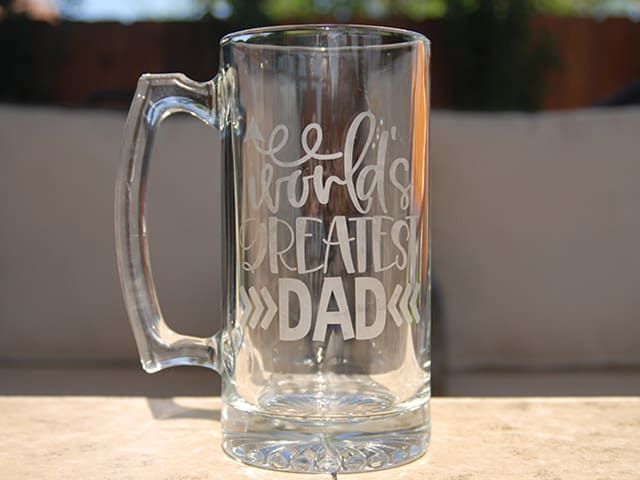
Of all the things I make with my cutter, I think I get the most compliments on etched items. I can see why, too. Etched items are unique and original and they are so pretty. So, I thought an etched mug would be a great gift to make for Father’s Day.
HERE’S WHAT YOU NEED
- Glass Mug (I found mine at Dollar Tree)
- Vinyl (Color doesn’t matter)
- Application Tool
- Transfer Tape
- Etching Cream
- Brush
- Gloves
- Electronic cutter (cricut explore, silhouette or other cutter)
- Cut File (available for free in my resource library)
HERE’S WHAT YOU DO
Start by opening the design in your software. Size it accordingly and place a rectangle around the design to create a stencil. I made the rectangle almost the same height as the mug to make positioning easier. Cut out the vinyl with your machine and remove the excess vinyl.
Do you need help creating a stencil design? Check out this step by step tutorial for Silhouette Users here and for Circut Users here.

Cut a piece of transfer tape a little bigger than the design. Place it over the vinyl and smooth it down with an application tool.
![]()
Trim off excess transfer tape and backing. Trim right along the vinyl on the top of the stencil.

To make it easier to put the vinyl on straight, we’re going to use the hinge method.
Have you ever heard of the hinge method? You use tape to act as a hinge when applying your vinyl. The tape keeps everything straight and centered while you’re applying the vinyl.
Place a small strip of vinyl (or painters tape) over the transfer tape.

Then, position the vinyl decal on the mug. Match up the straight edge of the stencil with the straight edge of the mug.

Once everything is centered and straight, press down on the vinyl strip. This should hold everything in place.

Separate the vinyl and the backing and then cut off and remove the backing.

Use an application tool or scraper to press the vinyl into place.

Remove the positioning strip of vinyl and then remove rest of the vinyl backing.

Press down the rest of the vinyl and rub over it several times so it sticks to the mug.

Carefully pull off the transfer tape. Rub over the design one last time.
![]()
Apply a thick layer of etching cream over the design. Just kind of dab it on. Don’t brush back and forth. It should be thick enough that you can’t see the stencil through the cream. If you have gloves, you should wear them. If you don’t, make sure you don’t touch the cream at all.

Leave the etching cream on the glass for about 5 minutes. When the time is up, rinse off the etching cream. Use plenty of water and wash thoroughly.
 Once you’ve washed off the etching cream, you can pull off the stencil. I think the vinyl comes off easier if I let hot water run over it.

And now you have an awesome personalized gift for dad.
Did you enjoy this post? Help spread the word! Share this post on your favorite Pinterest board. Thanks!

Want to make your own? Get the free cut file for this project in the resource library