HERE’S WHAT YOU NEED
-
- Wood for Sign
- Adhesive Vinyl (Any Color)
- Transfer Tape
- Weeding Tool
- Scraper
- Paint & Brushes
- Stencil Brushes
- Sandpaper
- Sawdust
- Clear Protective Spray
- Cinnamon
- Electronic cutter (cricut explore, silhouette or other cutter)
- Cut File – Hocus Pocus Broom Co. BA1710 (available for free in my resource library)
HERE’S WHAT YOU DO
STEP 1: DOWNLOAD THE FREE SVG FILE
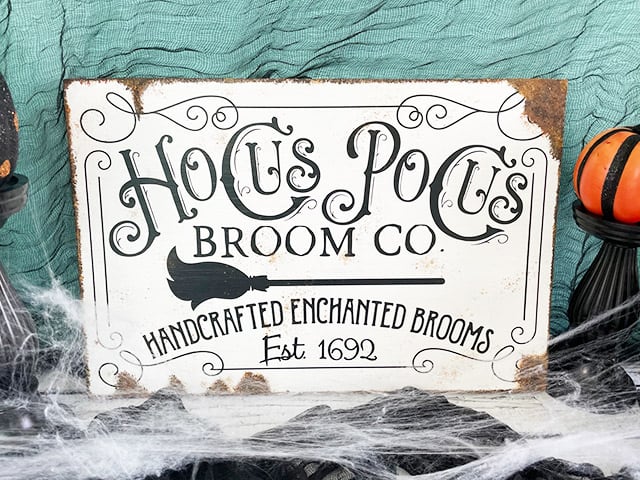
The first thing you’ll need to do is get the free SVG file you’ll use for this project. I keep all the SVG files I use for the projects I make in my SVG Library. These SVG files work with Cricut and Silhouette machines, as well as many others. This library is open to everyone and is free! You can access the library here. Look for the file called Hocus Pocus Broom Co. BA1710. It will be listed under the Halloween category.
STEP 2: CUT AND WEED VINYL DESIGN
Open the design in your software program and resize it so it will fit on your wood sign. My sign measures about 18″ x 12″, so I resized the design to about 17″ x 11″. Draw a rectangle around the design that is the same size as your wood to create a stencil. I used Oracal 651 in black, but you can use any color of vinyl.
Do you need more help with creating a vinyl stencil? Check out these posts.
How to Make a Vinyl in Cricut Design Space.
How to Make a Vinyl Stencil in Silhouette Studio
When everything is sized correctly, you can cut the stencil with your Cricut or Silhouette. Once it has finished cutting, weed away the excess vinyl.

Since this is a stencil, you’ll want to pull the letters and shapes out from inside the rectangle.
The little lines by the upper letters are kind of a pain, but I love the extra detail they add to the sign, so I think they’re worth it.

Cut a piece of transfer tape and place it sticky side up on your surface. Then place the vinyl on top of the transfer tape and smooth it down.
![]()
Rub over the designs firmly with your scraper tool.

Then, trim off the excess transfer tape and vinyl backing.
![]()
Now that the vinyl is ready to go, let’s work on the sign.
STEP 3: PREPARE WOOD SIGN
For the sign, I used a piece of wood that measures 18″ x 12″.
Sand over the wood so it’s nice and smooth.

Brush off any sawdust and then paint the sign white. You’ll probably need a couple of coats.

Once the paint is dry, it’s time to apply the vinyl stencil. Place the vinyl so it’s facing down, and then pull off the vinyl backing. I like to do it this way so the vinyl doesn’t curl.

Now, place the vinyl on the piece of wood. Match up the straight edges of the stencil with the straight edges of the wood. If your stencil doesn’t quite cover the wood, just center the design from top to bottom and make sure the side edges line up.

Once it’s in place, use a scraper and rub over the entire design.

Carefully pull off the transfer tape. There are a lot of small pieces that can come up with the transfer tape. Just go slow and use your fingers to hold those pieces in place.
![]()
Once the transfer tape is off, rub over the design again with your scraper.

If your stencil doesn’t cover all of the wood, you can add some painter’s tape to prevent unwanted paint from going onto the sign.

STEP 4: FILL IN THE STENCIL
Paint a light coat of white paint over the stencil.
Why do we do this? To help prevent bleeds.
Sometimes there are small gaps between the stencil and the wood. Our hope is that the white will fill in these gaps, instead of the black paint.

Once the white paint is dry to the touch, you can fill in the stencil with black paint. You’ll probably need to do two coats to get a nice even coverage.
 When the black paint is dry to the touch, you can carefully pull off the vinyl stencil.

Use a weeding tool or craft knife to remove the small pieces of vinyl inside the shapes and letters.

The sign looks great at this point, you can leave it as or you can distress it.

STEP 4: DISTRESS THE SIGN
We are going to add some faux rust to this sign.
If you can, I would recommend practicing this technique on a scrap piece of wood, just to make sure you like the look.
You can also take a look at some rusty items to get an idea of the colors to use.
 For my rust, I used 4 different colors of paint, dark brown, medium brown, orange, and mustard yellow.

Dip the brush in one of the colors and then wipe most of it off. Lightly dab some of the paint on your sign.

While the paint is still wet, sprinkle some sawdust over the brown paint and push it down into the paint with your finger. This will help add some texture to the faux rust.
Do this all over the edge of the sign, even down onto the sides. You’ll want to do different-sized sections, some big, some just barely there.

After you’ve done this all around the sign, lightly dab over the paint and sawdust with another color of paint. Make sure you don’t completely cover the first color of paint, you want to be able to see some of both colors.

Repeat these steps with the last two colors of paint. Let the paint dry for a bit, then repeat all those steps again, including adding the sawdust.
We’re just building up texture and paint to make it look more like rust.

After the second coat, you can just dab on paint (without adding more sawdust) until you are happy with the look. Let the paint dry completely and then brush off any loose sawdust.

This last step is where the magic happens. Spray a coat of clear protective spray over the entire sign.

Quickly sprinkle cinnamon in random places all over the sign. You’ll need to do this quickly before the spray dries.

Once you’re finished, allow the spray to dry completely and then brush off any loose cinnamon.
You can do a coat of finish over the top, but it will change the color of the cinnamon, so I didn’t.

That’s it, this project is finished! I think it turned out pretty cool!

Want to make your own? Get the free cut file for this project in the resource library