HERE’S WHAT YOU NEED
-
- Black Vinyl
- Transfer Tape
- Weeding Tool
- Scraper
- 5/8″ Wooden Dowel
- Large Paint Sticks or 1.5″ Wood Strip
- Burlap
- Jute Twine
- Hot Glue Gun & Glue
- Mod Podge
- Orange and Brown Paint & Brush
- Electronic cutter (cricut explore, silhouette or other cutter)
- Cut File – Salem Flying School BA1712 (available for free in my resource library)
HERE’S WHAT YOU DO
STEP 1: DOWNLOAD THE FREE SVG FILE
The first thing you’ll need to do is get the free SVG file you’ll use for this project. I keep all the SVG files I use for the projects I make in my SVG Library. These SVG files work with Cricut and Silhouette machines, as well as many others. This library is open to everyone and is free! You can access the library here. Look for the file called Salem Flying School BA1712. It will be listed under the Halloween category.
STEP 2: CUT AND WEED VINYL DESIGN
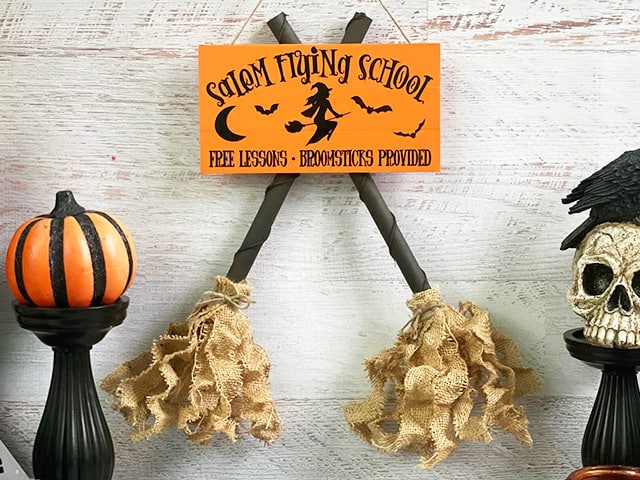
Open the design in your software program and resize it so it will fit on your wood sign. My sign measures about 8″ x 4.5″, so I resized the design to about 7.5″ x 4″. I used Oracal 651 in black for this design.
When everything is sized correctly, you can cut the stencil with your Cricut or Silhouette. Once it has finished cutting, weed away the excess vinyl.

Use a weeding tool to pull out the small pieces left inside the letters.

Cut a piece of transfer tape and place it sticky side up on your surface. Then place the vinyl on top of the transfer tape and smooth it down.
![]()
Rub over the designs firmly with your scraper tool.

Then, trim off the excess transfer tape and vinyl backing.

Now that the vinyl is ready to go, let’s work on the sign.
STEP 3: PREPARE WOOD PIECES
For the sign, you’ll need 3 – 8″ and 2 – 4″ pieces cut from a large paint stick or a 1.5″ piece of wood.
You’ll need an 11″, 7″, and 2.5″, cut from a 5/8″ wooden dowel.

Start by twisting some jute twine around the wooden dowel. Use hot glue on each end to keep the twine in place. Do this on all three pieces.

Paint the dowels dark brown. Set those aside and let them dry.

Next, place the 8″ wood strips facing down. Line them up so the edges are straight.

Then, add some glue onto one of the 4″ pieces and place it over all three wood strips about 1″ from the left edge.

Do the same with the other 4″ piece and place that close to the right edge. Allow the glue plenty of time to dry.

Paint the sign orange. You’ll probably need to do 2-3 coats on the front and sides. Painting the back is optional, but I like to do one quick coat to make everything look nice and finished.

After the orange paint is completely dry, it’s time to apply the vinyl. Remove the vinyl backing and then carefully position the vinyl on the wood.


Make sure it’s straight and centered and then press down on the vinyl. Rub firmly over the design with your scraper.

Then, carefully pull off the vinyl backing.
![]()
STEP 4: MAKE THE MINI BROOMS
We are going to be using strips of burlap to create the look of broom bristles. You’ll need 12 strips of burlap cut in 15″ x 1″ pieces. Take one of your strips and brush on a coat of Mod Podge on both of the ends. Brush it on the front and back of each side.

You’ll want to leave a 1″ section in the middle uncovered.

Fold the piece in half and gently scrunch it up. Separate any sections that are touching and set the strip aside to dry. Repeat with all the other strips.

To create the brooms, stack 6 pieces of burlap on top of each other at the folds. Space each one just a tiny bit apart so they are staggered.

Wrap the burlap around the bottom of the longest wooden dowel. It’s ok if it doesn’t go all the way around the dowel, that will be the back.

Now, grab some twine and wrap it around the burlap and the dowel several times about 1/2″ down from the top of the fold.

Tie the twine in a knot and then make a little bow and trim off the excess on the ends. Now, make another broom with the 7″ dowel.

STEP 5: ASSEMBLE THE SIGN
Grab the wooden Sign and flip it over. Place it on something to raise it a couple of inches above your work surface. Grab all three wooden dowels and form an X on the back of the sign.
The 2.5″ piece and top of the 11″ piece should go over the top of the sign about 1″. The 2.5″ piece and 7″ piece should be in a straight line, so it looks like it’s all one piece from the front.

When you’re happy with the placement, you can glue everything into place.

You can also cut a piece of twine and glue it onto the back so you can hang the sign.

And that’s it, another Halloween project is finished. Didn’t it turn out cute?

Did you enjoy this project? Make sure to pin it so you can find it later!

Want to make your own? Get the free cut file for this project in the resource library
Thank you!