
 This post contains affiliate links for your convenience (which means if you make a purchase after clicking a link I will earn a small commission but it won’t cost you a penny more)! Read my full disclosure policy.
HERE’S WHAT YOU NEED
-
- Tall Glass Candles
- Adhesive Vinyl (Dark Green)
- Transfer Tape
- Weeding Tool
- Scraper
- Twine
- Christmas Embellishments
- Electronic cutter (cricut explore, silhouette or other cutter)
- Cut File – Rustic Trees BA1816 (available for free in my resource library)
HERE’S WHAT YOU DO
STEP 1: DOWNLOAD THE FREE SVG FILE
The first thing you’ll need to do is get the free SVG file you’ll use for this project. I keep all the SVG files I use for the projects I make in my SVG Library. These SVG files work with Cricut and Silhouette machines, as well as many others. This library is open to everyone and is free! You can access the library here. Look for the file called Rustic Trees BA1816. It will be listed under the Craftmas 2021 Category-Day 11.
STEP 2: CUT AND WEED VINYL DESIGN
Open the design in your software program and resize it to fit on your tile. The candles I used are about 8″ tall. I resized the trees to 5″ tall. I used dark green adhesive vinyl for this project
When everything is finished cutting, remove the vinyl from your cutting mat and trim off any unused vinyl.
Weed away the excess vinyl from around the design.

Use the weeding tool to help remove the excess vinyl from inside the shapes.

Cut a piece of transfer tape and place it sticky side up on your surface. Then place the vinyl on top of the transfer tape and smooth it down.
![]()
Rub over the design firmly with your scraper tool.

Then, trim off the excess transfer tape and vinyl backing.

Next, we’re going to apply the vinyl to the candles.
STEP 3: ADD VINYL TO CANDLES
For this project, you’ll need 3 tall glass candles. I found mine at dollar tree. They all had sticky tags that had to be removed. I found the easiest way to remove the labels is to soak them in hot soapy water and then scrape them off. You can also clean the glass with some rubbing alcohol and let the candle air dry.

To stop the candle from rolling, you can roll up a towel or cloth from each end and place the candle in the middle
 Grab the vinyl design and pull off the vinyl backing.

Position the vinyl on the candle and press it into place. I’m going to be adding some embellishments to the top of the candle, I positioned the design closer to the bottom, instead of centering it.

Rub over the vinyl. Since the candle is curved, I thought it was easiest to just rub over the design with my hands.

Then, pull off the transfer tape. Repeat with the other two candles.
![]()
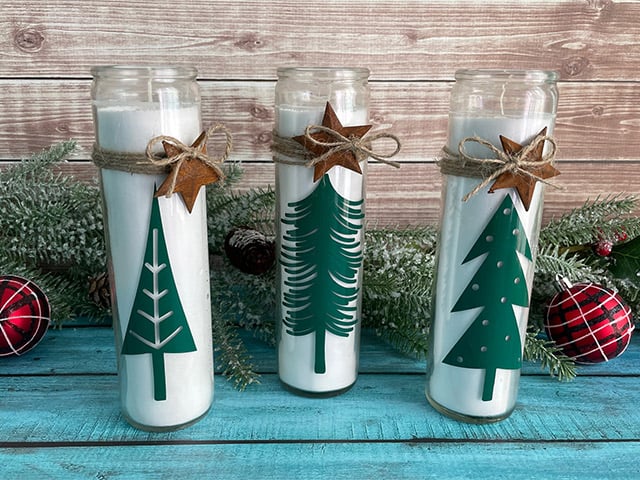
STEP 4: ADD EMBELLISHMENTS
Next, we’re going to dress up the tops of the candles. For these candles, I used twine and some rusty stars. You could also add bells, berries, or a little bit of pine. To make these candles, wrap some twine around the top of the candle 3 or 4 times and tie it in a double knot.

Then, threaded the twine through the hole on the rusty star. The hole was kind of small, so I put my weeding tool in the hole and pushed it around to make the hole a little bigger.

Tie the twine in another double knot and then trim off the ends.

Make a little bow out of the twine and glue that onto the star.

And that’s it, this project is finished.

Did you enjoy this post? Help spread the word! Share this post on your favorite Pinterest board. Thanks!
