HERE’S WHAT YOU NEED
-
- Glass Picture Frame
- Vinyl (2 Colors)
- Transfer Tape
- Weeding Tool
- Scraper
- Painter’s Tape
- Scrapbook Paper or Hot Glue Gun
- Electronic cutter (cricut explore, silhouette or other cutter)
- Cut File – Mother BA1496 (available for free in my resource library)
HERE’S WHAT YOU DO
STEP 1: DOWNLOAD THE FREE SVG FILE
The first thing you’ll need to do is get the free SVG file you’ll use for this project. I keep all the SVG files I use for the projects I make in my SVG Library. These SVG files work with Cricut and Silhouette machines, as well as many others. This library is open to everyone and is free! You can access the library here. Look for the file called Mother BA1496. It will be listed under the Mother’s Day category.
STEP 2: CUT AND TAPE VINYL DESIGN
Open the design in your software program. This design consists of the word mother and the brush strokes. You’ll need to create your own custom word search. I used education.com to create mine. Once your create the word search, you’ll need to take a screenshot so you can import the design into your software. You can see how I do this by watching the video above.
Once you’ve brought the word search into your software, you’ll need to do a trace to turn it into a cut file (I also show how to do this in Cricut Design Space in the video). Then, you can resize it to fit on your piece of glass. You’ll also want to resize the word mother and the brush strokes so they cover the names you want highlighted.

We are going to be putting the design on the back of the glass, so you’ll need to mirror (or reverse) the design. Then, you can cut out the two colors of vinyl.
Weed away the excess vinyl from around the letters and brush strokes.

Use a weeding tool to pull out the tiny pieces inside of the letters..

Cut a piece of transfer tape and place it sticky side up on your surface. Then place the vinyl on top of the transfer tape and smooth it down.
![]()
Rub over the design firmly with your scraper tool.

Then, trim off the excess transfer tape and vinyl backing and cut apart the different sections.

STEP 3: APPLY VINYL TO GLASS
For this project, we’re going to be using the hinge method to apply the vinyl.
Start by removing the glass from the frame and clean it with a lint free cloth and then let it air dry.

Place the design on the center of the glass and put a piece of tape over the center of it.

Use a ruler to make sure the design is straight and centered. Once it’s in place, press down on the tape.

Next, you’re going to separate the vinyl and the backing from the right half of the design.

Pull the vinyl over the tape and then cut off and remove the backing.

Use a scraper to press the design down. You’ll want to start at the tape and push to the right.

Now, remove the painter’s tape and the rest of the vinyl backing.

Use a scraper to press the rest of the design down.

Now, you can carefully pull off the transfer tape.
![]()
Grab your brush stokes and place them over the names you want to cover so you know which strokes go where.

Remove the backing from one of the strokes and position it over the name.

Since these are brush strokes, they don’t have to be perfectly straight or centered. Just do your best to make them look good.

Press the vinyl down with your scraper and then remove the transfer tape.
![]()
Repeat those steps with all the brush strokes.

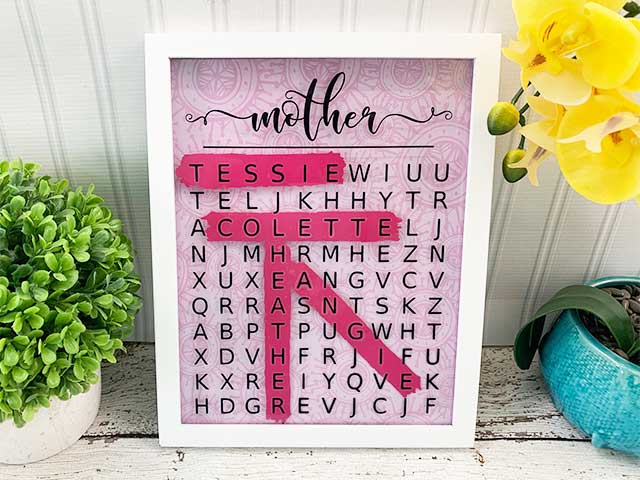
When you flip the glass over, you’ll probably see lots of air gaps between the letters and the brush strokes.

You can flip the glass back over and firmly press around each letter with your finger. This should help to get rid of most of those gaps.

STEP 3: APPLY VINYL TO GLASS
There are a couple of options to finish this frame. You can either add a piece of scrapbook paper behind the glass and then put the picture backing back into place.

Or, if you want a floating frame, you can break off the metal tabs. Then, add hot glue around the edges of the frame
and press the glass into place.

And that’s it. This project is finished. Now, you have an adorable custom made gift for Mother’s Day!

Did you enjoy this post? Help spread the word! Share this post on your favorite Pinterest board. Thanks!
