 This post contains affiliate links for your convenience (which means if you make a purchase after clicking a link I will earn a small commission but it won’t cost you a penny more)! Read my full disclosure policy.
HERE’S WHAT YOU NEED
- Wood Shadow Box Frame (Mine measured approx. 6″ x 8″)
- Paint and Brushes (I used Black)
- Mod Podge
- Solid Cardstock (I used yellow and green)
- Printed Cardstock for Background (I printed my own using this digital paper)
- Double Sided Foam Tape
- Scissors
- Sandpaper
- Electronic cutter (cricut explore, silhouette or other cutter)
- Cut File (available for free in my resource library)
HERE’S WHAT YOU DO
STEP 1: DOWNLOAD THE FREE SVG FILE
The first thing you’ll need to do is get the free SVG file you’ll use for this project. I keep all the SVG files I use for the projects I make in my SVG Library. These SVG files work with Cricut and Silhouette machines, as well as many others. This library is open to everyone and is free! You can access the library here. Look for the file called Mandala Lemon. It will either be listed under the most recent projects/cut files or under the Summer category.
STEP 2: PREPARE WOODEN FRAME
Sand the wooden frame so it’s nice and smooth, then paint it black. This frame was in my stash, but I think I found it at Walmart.

You don’t need to paint inside of the frame because we’ll be covering that with patterned paper.

STEP 3: PREPARE THE MANDALA DESIGN
While the paint is drying, let’s get the mandala ready. Open the design in your software program and size it to fit on your wooden frame. Keep all the layers together while you are resizing so everything stays proportional. Once the size is set, if needed, you can ungroup the design to cut it out.
The inside of my frame measured about 4.5″ x 6.5″, so I sized the design to about 3.5″ x 5″.
There are two decorative layers and one solid lemon shape in this design, plus the leaves. You can cut the three lemon shapes out of different shades of yellow, or all the same color. It just depends on how much contrast you want on the finished project. I used two shades that were very similar, just to give it a tiny bit of contrast.
When everything is sized correctly, you can cut the lemon and leaves with your Cricut or Silhouette.
Once everything is cut, remove the design from the mat. To prevent the cardstock from curling, flip the mat over. Slightly bend the mat back, keeping the cardstock straight, to remove the design. Most of the cut pieces should stick to the mat. If there are any left in the lemon, carefully push them out with your fingers or a weeding tool.


Once you’ve got your lemon pieces cut, it’s time to start layering. Stack the layers on top of each other in the correct order. The design with the skinniest lines goes on top, then the next layer, and the solid lemon shape goes on the bottom.

We’re going to start working on the middle layer. Cut tiny strips of double sided foam tape and place on the back of the lemon shape. You’ll want to cut the tape as skinny as possible so it fits inside the lines without hanging over. Place the tape on several lines on the design, both around the edge and in the middle. Then, remove the tape backing.

Center the middle layer over the back layer and push down to secure it in place.

Repeat these steps with the top layer.

Put a few pieces of double sided tape on the back of the solid lemon shape and on the back of the leaves, but leave the tape backing on for now.

Now you have an awesome dimensional design.

STEP 4: ADD DECORATIVE PAPER TO FRAME
Now, we’re going to add some cute paper to the frame to create a background for the lemon. If you can’t find a design you like in the stores, you can print your own! I printed my own using this digital paper
Measure the inside of your frame and trim down your scrapbook paper to fit.

Coat the inside of the frame with a nice even layer of Mod Podge.

Then, place your scrapbook paper inside the frame. Make sure you do this quickly so the Mod Podge doesn’t dry before the paper is in. Rub over the paper to help it stick and remove any bubbles.

Place the leaves and lemon inside the frame (don’t remove the tape backing yet). Move them around until you like how they are positioned.

Once you like how it looks, remove the tape backing and press everything into place.

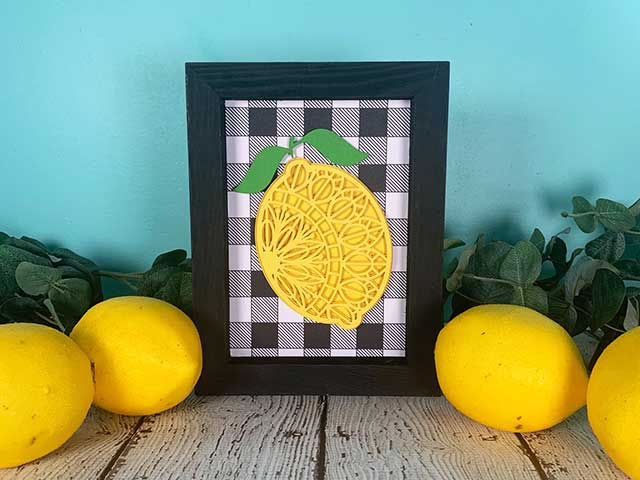
And that’s it – don’t you love how it turned out!


Did you enjoy this post? Help spread the word! Share this post on your favorite Pinterest board. Thanks!
