HERE’S WHAT YOU NEED
-
- Vinyl (24″ piece)
- Transfer Tape
- Weeding Tool
- Scraper
- Painter’s Tape
- Sandpaper
- Wood Glue
- Nail Gun or Hammer & Nails
- Staining Supplies (I used Dark Walnut)
- Polyurethane Finish (I used Triple Thick Polyurethane Satin)
- Handles (I got mine from Walmart)
- Roasting Sticks (Optional) – I used telescoping stick like these
- Electronic cutter (cricut explore, silhouette or other cutter)
- Cut File – S’mores Station BA1534 (available for free in my resource library)
HERE’S WHAT YOU DO
STEP 1: DOWNLOAD THE FREE SVG FILE
The first thing you’ll need to do is get the free SVG file you’ll use for this project. I keep all the SVG files I use for the projects I make in my SVG Library. These SVG files work with Cricut and Silhouette machines, as well as many others. This library is open to everyone and is free! You can access the library here. Look for the file called S’mores Station BA1534. It will be listed under the Summer category.
STEP 2: CUT AND WEED VINYL DESIGN
Open the design in your software program and resize it so it fits on your box. The box I made measures 22″ x 9″ x 3.5″, so I resized my design to 21.3″ x 3.25″. Once you’ve resized the design, you can cut it with your machine. This is a big design, so you’ll need to use a 24″ piece of vinyl and a large cutting mat.
When everything is finished cutting, remove the vinyl from your cutting mat and trim off any unused vinyl.
Weed away the excess vinyl from around the design.

Use the weeding tool to help remove the excess vinyl from inside the letters and shapes.

Cut a piece of transfer tape and place it sticky side up on your surface. Then place the vinyl on top of the transfer tape and smooth it down.

Rub over the design firmly with your scraper tool.

Then, trim off the excess transfer tape and vinyl backing
![]()
STEP 3: BUILD S’MORES BOX
This wood box is really easy to make because it’s all straight cuts. If you don’t want to make your own, you could probably find something similar at the craft store.
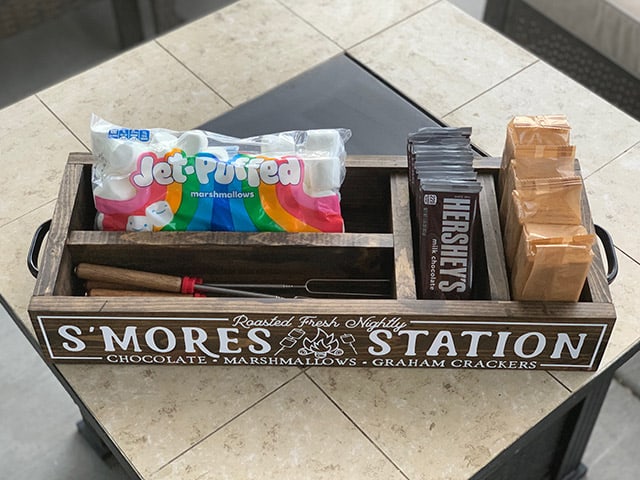
The great thing about this box is you can make it any size you want. My finished box measures about 22″ x 9″ and has room for chocolate bars, graham crackers, marshmallows, and roasting sticks. But, if you want more or less space, you can adjust the size to fit your needs.
So, for a 22″ x 9″ box, you’ll need:
1 – 7.5 x 20.5″ piece for the bottom (cut from 1″ x 8″ pine)
2 – 22″ x 3.5″ pieces for the front and back (cut from 1″ x 4″ pine)
2 – 7.5″ x 3.5″ pieces for the sides (cut from 1″ x 4″ pine)
If you want to add dividers inside the box, you can use a 1″ x 3″ piece of pine for those and you’ll cut them down to size after you’ve built the box.

Use some sandpaper and sand over all the pieces of wood. Make sure the front piece (where the vinyl will be) is nice and smooth so the vinyl will stick properly.

To make the box, add some wood glue along the bottom of the side piece.

Use a nailer (or hammer and nails) to secure the side piece to the bottom of the box. Repeat with the other side.

Add wood glue to the bottom and sides of the front piece and nail into place.

Repeat with the back piece.

If there’s any excess glue, make sure to wipe it away. This is really important if you decide to stain your box.

If you want to add dividers, you’ll want to measure inside the box to get your dimensions. For this box, I wanted two smaller compartments on the right side for the graham crackers and chocolate bars. I used 2 pieces of wood that measured 7.5″ x 2.5″. Then, on the left side, I wanted two long skinny compartments. One for the marshmallows and the other for the roasting sticks. That piece measured about 13″ x 2.5″. Cut, glue, and nail those pieces into place.

Now you can stain your box. Remove any sanding dust and then stain with the color of your choice. I used dark walnut for this box. I like to use a foam brush to apply the stain.

I usually apply the stain and wipe it right off with an old towel or blue shop paper towel. But if you’d like a darker color, you can let it sit for about 10 minutes before wiping. Once you’ve got the box stained, let it dry for a couple of hours.

Next, we need to apply a polyurethane finish so that the vinyl will stick to the box. You can use either a brush-on finish or a spray. I used the spray on Triple Thick Polyurethane in matte.

After the sealer has had plenty of time to dry, it’s time to add the vinyl design.

STEP 4: APPLY VINYL TO THE BOX
For this project, we’re going to be using the hinge method to apply the vinyl.
Place the design on the center of the box and put a piece of tape over the center of it.

Use a ruler to make sure the design is straight and centered.

Once it’s in place, press down on the tape.

Next, you’re going to separate the vinyl and the backing from the right half of the design.

Pull the vinyl over the tape and then cut off and remove the backing.

Use a scraper to press the design down. You’ll want to start at the tape and push to the right.

Now, remove the painter’s tape and the rest of the vinyl backing.

Use a scraper to press the rest of the design down.
 Rub over the design a few more times.

Now, you can carefully pull off the transfer tape.
![]()
STEP 5: ADD FINISHING TOUCHES
To complete the box, attach handles to the sides of the box.
 Then, fill it up with your favorite s’mores supplies!

And that’s it! This project is finished.

This is such a great way to organize the s’mores supplies! My kids are already asking when we can make them next!

Want to make your own? Get the free cut file for this project in the resource library