HERE’S WHAT YOU NEED
-
- Wood for Sign (I used a 48″ x 7.25″ piece of pine)
- Vinyl (3 – 12″ x 12″ pieces)
- Sandpaper
- Transfer Tape
- Weeding Tool
- Scraper
- Staining Supplies (I used Dark Walnut)
- Polyurethane Finish (I used Triple Thick Polyurethane Satin)
- Electronic cutter (cricut explore, silhouette or other cutter)
- Cut File – Welcome-ish BA1499 (available for free in my resource library)
HERE’S WHAT YOU DO
STEP 1: DOWNLOAD THE FREE SVG FILE
The first thing you’ll need to do is get the free SVG file you’ll use for this project. I keep all the SVG files I use for the projects I make in my SVG Library. These SVG files work with Cricut and Silhouette machines, as well as many others. This library is open to everyone and is free! You can access the library here. Look for the file called Welcome-ish BA1499. It will be listed under the Everyday category.
STEP 2: CUT AND TAPE VINYL DESIGN
Open the design in your software program. Resize it so it will fit nicely on your piece of wood. I sized mine to about 46″ x 6″. Add alignment guides along the top and left and right edges to make positioning the design on your board easier. If you have to cut the design in sections, you’ll also want to add some registrations marks above and below your letters. You can see how I do this in Design Space by watching the video above.

If you’re cutting the design in sections, you’ll need to cut it on 3 – 12″ x 12″ pieces of white vinyl.
Weed away the excess vinyl from around the letters.

Use a weeding tool to pull out the tiny pieces inside of the letters..

Cut a piece of transfer tape a little bigger than the designs. Place the transfer tape sticky side up on your surface, then place the vinyl on top of the transfer tape and smooth it down.
![]()
Rub over the design firmly with your scraper tool.

Then, trim off the excess transfer tape and vinyl backing and cut apart the differen sections.

STEP 3: PREPARE THE WOOD SIGN
Now that the vinyl is ready, let’s work on getting the wood ready. Sand your board so it’s nice and smooth. You can sand by hand or use an electric sander.

Remove any sanding dust and then stain with the color of your choice. I used dark walnut for this sign. I like to use a foam brush to apply the stain.

Then, wipe off the excess stain with an old towel or blue shop paper towel. I usually apply the stain and wipe it right off, but if you’d like a darker color, you can let it sit for about 10 minutes before wiping. Let dry for a couple of hours

Apply a polyurethane finish. You can use either a brush on finish or a spray. I used the spray on Triple Thick Polyurethane in Satin
Let the sealer dry for a couple of hours.

STEP 3: ADD THE VINYL LETTERING
Grab the vinyl with the letters W & E and pull off the vinyl backing. Position the vinyl on your piece of wood. You’ll want to match up the lines with the edges of the board.

Once it’s in place, rub over the design with your scraper

Then, carefully pull off the transfer tape. You can pull off the alignment guides at the top, but make sure the registration marks stay in place.
![]()
Next, grab the vinyl with the l & C and pull of the vinyl backing.

Now, you’re going to replace the vinyl backing, but shift it down just a bit so only the registration marks are showing.

Place that vinyl on the wood sign and match up the registration marks

Press down on the transfer tape.

Carefully remove the vinyl backing again. It should come off easily since we already took it off earlier. Be very careful to make sure the registration marks stay in place.

Then, slowly press the white vinyl onto the sign and rub over it firmly with your scraper.
 Once everything has been pressed down, carefully pull off the transfer tape.
![]()
Repeat these steps until all the vinyl has been applied.

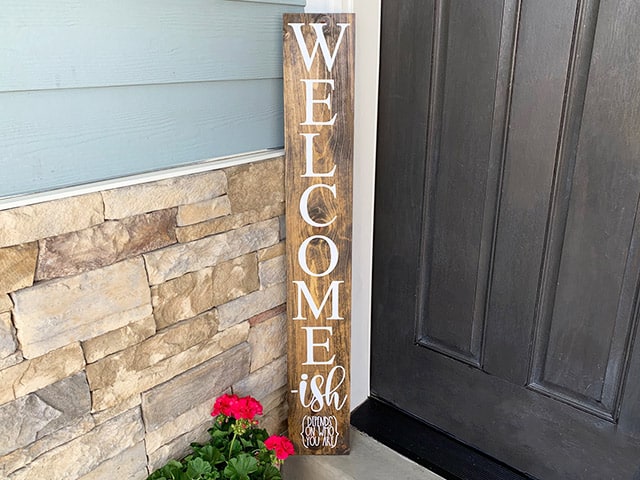
Then, you can pull off the registration marks. You can seal your sign if you want, but since mine is going under a covered porch, I decided not to. That’s it this project is finished, now you just need to find a place to display your sign on your front porch!
Did you enjoy this post? Help spread the word! Share this post on your favorite Pinterest board. Thanks!
