

HERE’S WHAT YOU NEED
- Shadow Box (I found mine at Michael’s)
- Vinyl (I used red and black)
- Transfer Tape
- Glitter Snow
- Winter Tree Background (I found mine here)
- Glue
- Electronic cutter (cricut explore or maker, silhouette or other cutter)
- Cut File – Walking in a Winter Wonderland BA2111 (click here to get the SVG file for free from my free SVG Library)
HERE’S WHAT YOU DO
STEP 1: DOWNLOAD THE FREE SVG FILE
The first thing you’ll need to do is get the free SVG file you’ll use for this project. I keep all the SVG files I use for the projects I make in my SVG Library. These SVG files work with Cricut and Silhouette machines, as well as many others. This library is open to everyone and is free! You can access the library here. Look for the file called Walking in a Winter Wonderland BA2111. It will be listed under the Craftmas 2022 Category-Day 11.
STEP 2: CUT THE VINYL DESIGNS
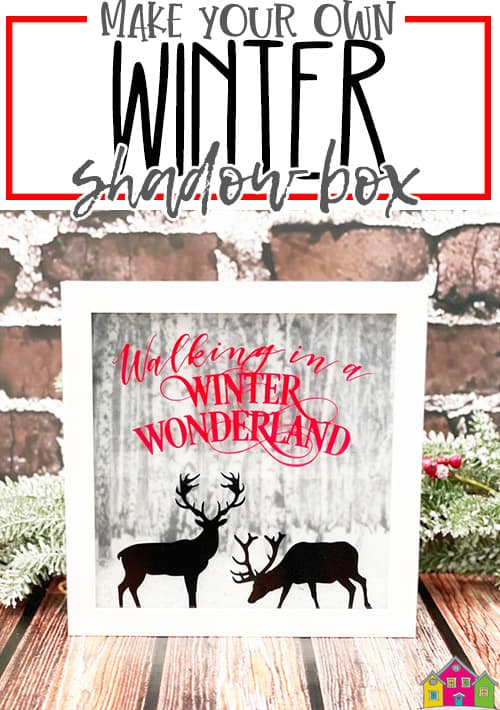
Open the designs in your software program. Keep everything grouped together and resize the design to fit on the glass inside your frame. The frame I’m using is 8″, so I resized my design to about 6.5″ wide. I also added a line about 1” above the top of the design as an alignment guide.
When everything is sized correctly, cut the design with your Cricut or Silhouette. I used red for the words and black for the animals.
Once everything is cut, weed away the excess vinyl.

Use your weeding tool to pull out the pieces inside of the letters.

Cut a piece of transfer tape a little larger than your designs and place them on top.
![]()
Rub over the designs with your scraper.

Trim off the excess transfer tape and cut apart the designs.

STEP 3: APPLY THE VINYL DESIGN
Remove the glass from your shadow box frame and clean it with some rubbing alcohol.

Grab your red vinyl and pull off the vinyl backing.

Then, replace the backing, but leave the alignment guide exposed.

Line up the top of the alignment guide with the top of the glass. Make sure the design is centered from right to left.

Press down on the alignment guide.

Carefully pull off the vinyl backing. Make sure the alignment guide stays in place.

Use your scraper to press the vinyl onto the glass.

Then, you can pull off the transfer tape and the alignment guide.
![]()
Repeat with the black layer. On this layer, I left a little of the antler exposed while I positioned the vinyl. Then, you can remove the backing, rub down the vinyl, and remove the transfer tape.

STEP 4: FINISH THE SHADOW BOX
I found this pretty image of some birch trees and printed it onto regular paper. Then, I just glued it onto the backing of the shadowbox frame and trimmed it down to size. There are lots of images of winter trees online, find one you like to glue to the backing.

If you want to soften or diffuse the background a little bit, you can add some transfer tape to the back of the piece of glass. Use your scraper to press it down. Then, trim off the excess.
![]()
Place the glass back into the frame. If your frame has a spacer, put that back in, too.
![]()
Add some glitter snow to the bottom of the frame.

Replace the frame backing.

And this project is complete.


Did you enjoy this post? Help spread the word! Share this post on your favorite Pinterest board. Thanks!
Want to make your own? Get the free cut file for this project in the resource library