HERE’S WHAT YOU NEED
-
- Wood for Sign (I used a 1″x 3″, 1″x4″, and 1″x6″ piece of pine)
- White Adhesive Vinyl (I got mine here)
- Cardstock (any color)
- Sandpaper
- Transfer Tape
- Weeding Tool
- Scraper
- Staining Supplies (I used Golden Pecan)
- Polyurethane Finish (I used Triple Thick Polyurethane)
- Wood Glue
- Electronic cutter (cricut explore, silhouette or other cutter)
- Cut File – Home for the Holidays BA1823 (click here to get the SVG file for free from my free SVG Library)
HERE’S WHAT YOU DO
STEP 1: DOWNLOAD THE FREE SVG FILE
The first thing you’ll need to do is get the free SVG file you’ll use for this project. I keep all the SVG files I use for the projects I make in my SVG Library. These SVG files work with Cricut and Silhouette machines, as well as many others. This library is open to everyone and is free! You can access the library here. Look for the file called Home for the Holidays BA1823. It will be listed under the Craftmas 2021 Category-Day 25.
STEP 2: CUT AND WEED VINYL DESIGN
Open the design in your software program and resize it to fit on your pieces of wood.
You’ll need to measure the exact width of each piece of wood you’re using and resize the house and outline to that size. For example, the two large designs fit on a 1″x6″. But, my 1″x6″ actually measures 5.5″ across. So, I would resize the two large houses to 5.5″ and so on.
When everything has been sized correctly, you can cut the designs with your Cricut or Silhouette.
You’ll want to cut the solid house pieces out of cardstock and cut the outlines out of white vinyl.
To remove the cardstock from the cutting mat, you’ll want to slightly bend the mat and pull off the cardstock. This should keep the cardstock from curling.
Remove the vinyl from your cutting mat and trim off any unused vinyl.
Weed away the excess vinyl from around the designs.
Use the weeding tool to help remove the excess vinyl from inside the houses and letters.
Cut a piece of transfer tape and place it sticky side up on your surface. Then place the vinyl on top of the transfer tape and smooth it down.
Rub over the designs firmly with your scraper tool.
Then, trim off the excess transfer tape and vinyl backing and cut the houses apart.
STEP 3: PREPARE THE WOOD PIECES
Place the cardstock pieces on the wood.
Trace the shapes of the roofs of the houses onto your wood pieces. Then, cut out the wood. I used a jigsaw, but you could also use a handsaw. I’m not great with a jigsaw and my cuts aren’t totally straight and that’s ok. So, if yours aren’t perfect either, don’t worry. Just do your best to cut on the lines. Once you’ve finished cutting the shapes, sand the wood so it’s nice and smooth.
Next, we are going to stain the houses. You can use any color you want. I used golden pecan. I like to use a foam brush to apply the stain.
Then, wipe off the excess stain with an old towel or paper towel. I applied the stain and let it sit for just a minute or so and then wiped it off. If you’d like a darker color, you can let it sit longer before you wipe it off. Let the stain dry for several hours.
Apply a polyurethane finish. You can use either a brush-on finish or a spray. I used the spray on Triple Thick Polyurethane.
Let the sealer dry for a couple of hours. If the surface of the wood doesn’t feel smooth, you can lightly sand the wood to even out the finish.
STEP 4: APPLY THE VINYL DESIGNS
Next, we’re going to apply the vinyl to the houses.
Line up the houses and put the corresponding design on top of each house.
Grab one of the designs and pull off the vinyl backing.
Position the design on the wood. The designs themselves aren’t perfectly straight and even and that’s to help hide cuts that aren’t straight. So, just do your best to make the design straight and centered.
Then rub over the vinyl with a scraper.
Carefully pull off the transfer tape.
Add the vinyl designs to all the other houses.
STEP 5: ASSEMBLE THE HOUSES
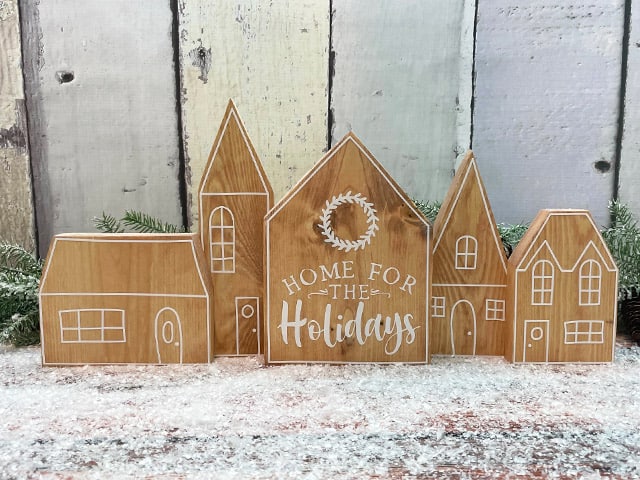
Now, we’re going to assemble the houses. To make assembly easier, you’ll want to use a few wood scraps to raise up the first middle, and last house.
Adjust the spacing of the houses so it looks good. The houses need to overlap each other by a quarter to 3/8″ of an inch.
When you’re happy with the spacing, you can glue the pieces together.
I pushed a long piece of wood up against the bottom of the houses to make sure the edges were all lined up.

Then, let the glue dry completely. This probably takes a couple of hours. Once the glue is dried, you can stand up the houses.
And that’s it, this project is finished! I love how it turned out!
Did you enjoy this post? Help spread the word! Share this post on your favorite Pinterest board. Thanks!
Want to make your own? Get the free cut file for this project in the resource library


You saved the best for las – I love this!,