HERE’S WHAT YOU NEED
-
- Pumpkin (If you’re just doing the paint pour without the vinyl design, you can use either a real pumpkin or a craft pumpkin. If you’re adding the vinyl, you need to use a craft pumpkin)
- Acrylic Paint in Fall Colors
- Pouring Medium
- Cups and Stir Sticks
- Gloves
- Disposable Pan or Box
- Painters Tape
- Adhesive Vinyl (White)
- Transfer Tape (Don’t use the strong grip transfer tape)
- Weeding Tool
- Scraper
- Electronic cutter (cricut explore, silhouette or other cutter)
- Cut File – Hello Fall BA1667 (available for free in my resource library)
HERE’S WHAT YOU DO
STEP 1: DOWNLOAD THE FREE SVG FILE
The first thing you’ll need to do is get the free SVG file you’ll use for this project. I keep all the SVG files I use for the projects I make in my SVG Library. These SVG files work with Cricut and Silhouette machines, as well as many others. This library is open to everyone and is free! You can access the library here. Look for the file called Hello Fall BA1667. It will be listed under the Fall category.
STEP 2: CUT AND WEED VINYL DESIGN
Open the design in your software program and the design so it will fit on the front of your pumpkin. My pumpkin was about 6″ tall so I made the width of all the letters about 4.5″. Once you’ve resized the design, you can cut it with your machine. I used Oracal 651 in white for this project
When everything is finished cutting, remove the vinyl from your cutting mat and trim off any unused vinyl.
Weed away the excess vinyl from around the design.

Use the weeding tool to help remove the excess vinyl from inside the letters and leaves.

Cut a piece of transfer tape and place it sticky side up on your surface. Then place the vinyl on top of the transfer tape and smooth it down.
![]()
Rub over the designs firmly with your scraper tool.

Then, trim off the excess transfer tape and vinyl backing and cut apart the letters.

Now that the vinyl is ready to go, let’s work on the pumpkin
STEP 3: PAINT THE PUMPKIN
First, you’ll want to add some pushpins or nails on the bottom of the pumpkin to raise it off your work surface so the paint can get onto the bottom of the pumpkin. You’ll also want to tape off the stem of your pumpkin, so you don’t get paint on it.
If you’re just doing the paint pour without the vinyl design, you can use either a real pumpkin or a craft pumpkin. If you’re adding the vinyl, you need to use a craft pumpkin

Next, grab your acrylic paint. It’s up to you which colors you use, but since this is a fall pumpkin, I chose some fall colors. I used red, orange, brown, and goldenrod for this pumpkin. I also added some turquoise to one of the other pumpkins I did and loved how it turned out.

Put some paint in a cup – the amount you use is going to depend on the size of your pumpkin. I’m using a pumpkin that is about 6″ tall and 7″ across and I used about 1 1/2 ounces of each color.

After you’ve added the paint to the cup, you’ll need to add some pouring medium to each cup.

The mixture should be equal parts, so half paint, half pouring medium.

Use a stir stick to mix it together.

Now, grab a bigger cup and start pouring the paint mixtures in it. I added about half of each color and then went back and added more of each color. You can add the colors in any order you want.

Now that the paint is ready to go, it’s time for the fun part.
Place your pumpkin in a box or disposable pan and put on some gloves. This part can get really messy.
Take the cup of paint and start pouring it over the top of the pumpkin.

Some of the paint will probably slide to the middle towards the stem and some will drip down the pumpkin.

Pour the paint around the pumpkin. The bumps of the pumpkin make it a little tricky for the paint to coat the whole pumpkin, so I started moving the cup down the pumpkin as I poured the paint around it.

After you’ve got a good coat of paint dripping down the pumpkin, let it sit for and few minutes.

If there are parts of it you don’t like or just want to add more color, you can go back over those sections with more paint.

You can also pick up the pumpkin and tip it to the side to help the paint cover those sections.

I also used my finger to drag paint onto any areas that were left uncovered. You can also wipe off any drips from under the pumpkin.

When you’re happy with the look, you can let the pumpkin sit and dry overnight. It might be tempting to touch it, but try not to. There’s a lot of paint on the pumpkin and it will take a while to dry. If you touch it too soon, you could mess up the paint.
After the paint on the sides had dried, you can pick up the pumpkin and wipe off the excess paint from the bottom. Then, flipped it over and pull out the pins. If you want, you can use some of the leftover paint to even out the bottom.

STEP 4: ADD VINYL DECAL
The pumpkin looks really cool at this point without doing anything else, but we’re going to add the vinyl lettering to dress it up a bit.
First, find the side of the pumpkin you like the most. That’s where you’ll want to put the decal.

Since the surface of the pumpkin is curved, it will make the vinyl easier to apply if you trim off as much of the excess vinyl backing as possible. Then, cut several slits between the letters and shapes.

Now, pull off the backing.

Position the design over the pumpkin. Do your best to make it straight and centered. When you’re happy with the placement, push the vinyl onto the pumpkin, starting in the middle of the design and working your way outward.

Just a warning, once the vinyl has touched the painted surface, you won’t be able to get it off without messing up the paint, so be very careful as you apply the vinyl. Rub over the entire decal to make sure it’s pressed into place.

I thought it was easiest to do this with my hands rather than use a scraper.

Now, carefully pull off the transfer tape. I was a little worried the transfer tape would pull the paint off the pumpkin, but it didn’t. I tried it with a smooth craft pumpkin and a styrofoam pumpkin from Dollar Tree and both were fine. Just be sure you don’t use the strong grip transfer tape.
![]()
The last thing you need to do is remove the tape from the stem. If you notice it’s not coming off easily, you can use a craft knife to slice the paint around the stem, and then you should be able to pull off the tape.

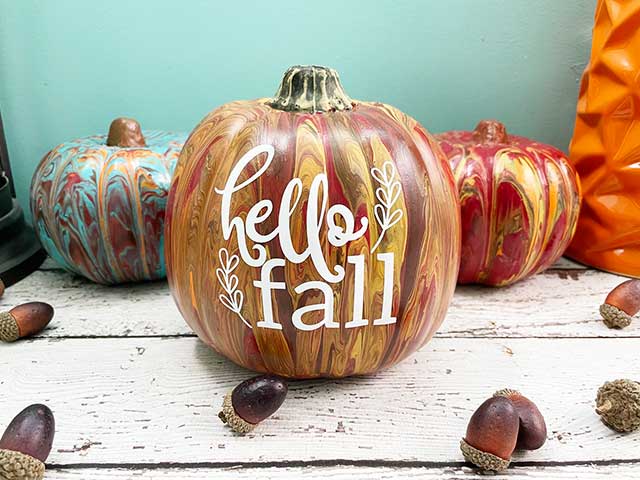
And that’s it – your project is finished. Now you just need to find a place to display your new fall pumpkin!

Don’t you love how it turned out?

Want to make your own? Get the free cut file for this project in the resource library
Your pumpkin is absolutely fantastic! Fall is my favorite season and your pumpkin colors say it all! Thank you for the directions and here’s hoping mine turns out half as beautiful as yours. And thank you for all the free svgs you offer to us. Happy Fall to you!
Thank you!