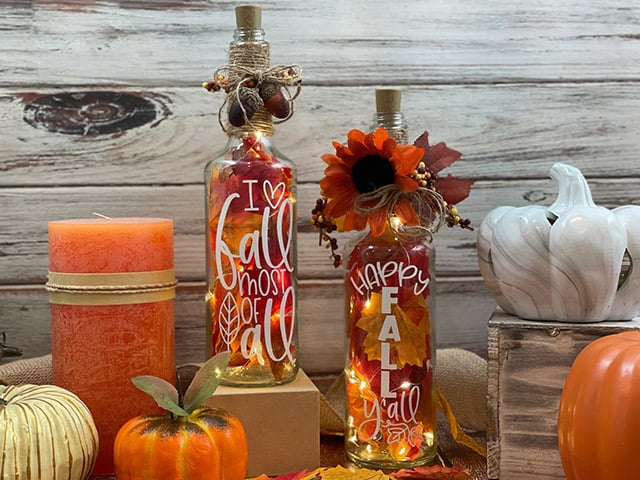
HERE’S WHAT YOU NEED
-
- Tall Glass Bottles (clear glass works best) I used these
- Adhesive Vinyl (White)
- Transfer Tape
- Painter’s Tape
- Weeding Tool
- Scraper
- Wine Cork Lights
- Twine
- Artificial Fall Leaves
- Fall Embellishments
- Hot Glue Gun & Glue
- Electronic cutter (cricut explore, silhouette or other cutter)
- Cut File – Fall Quotes BA1694 (available for free in my resource library)
HERE’S WHAT YOU DO
STEP 1: DOWNLOAD THE FREE SVG FILE
The first thing you’ll need to do is get the free SVG file you’ll use for this project. I keep all the SVG files I use for the projects I make in my SVG Library. These SVG files work with Cricut and Silhouette machines, as well as many others. This library is open to everyone and is free! You can access the library here. Look for the file called Fall Quotes BA1694. It will be listed under the Fall category.
STEP 2: CUT AND WEED VINYL DESIGN
Open the design in your software program and resize the designs so they fit on your bottles. My bottles measured about 10″ around, so I made each design 3″ wide. Be sure to check the height and make sure it will fit on your bottle. Once you’ve resized the design, you can cut it with your machine. I used Oracal 651 in white for this project
When everything is finished cutting, remove the vinyl from your cutting mat and trim off any unused vinyl.
Weed away the excess vinyl from around the design.
Use the weeding tool to help remove the excess vinyl from inside the letters and shapes.
Cut a piece of transfer tape and place it sticky side up on your surface. Then place the vinyl on top of the transfer tape and smooth it down.
Rub over the designs firmly with your scraper tool.
Then, trim off the excess transfer tape and vinyl backing and cut apart the two designs.
Now that the vinyl is ready to go, let’s work on the bottles.
STEP 3: ADD VINYL TO BOTTLES
For this project, you’ll need a couple of tall glass bottles. I found that clear bottles work best. My bottles measures about 10″ around and the lower part of the bottle without the neck is about 7″ tall.
The first thing you’ll need to do is clean your bottles. I found the easiest way to remove the labels is to soak them in hot soapy water and then scrape them off. If there is any sticky residue you can use rubbing alcohol or goo gone to take it off. Let the bottle dry completely on the inside and outside.
Once the bottle is dry, it’s time to add the vinyl lettering.
To stop the bottle from rolling, you can roll up a towel from each end and place the bottle in the middle.
We’re going to be using the hinge method to apply these vinyl decals to our glass bottles. Place the design on the bottle and put a piece of painter’s tape over it.
Make sure the design is straight and centered. You can use a ruler, but I just kind of eyed it. Once you’re happy with the placement, press the down firmly on the tape.
Next, you’re going to separate the vinyl and the backing from the right half of the design.
Pull the vinyl over the tape and then cut off and remove the backing.
Use a scraper to press the design down. You’ll want to start at the tape and push to the right.
Now, remove the painter’s tape and the rest of the vinyl backing.
Use a scraper to press the rest of the design down.
Now, you can carefully pull off the transfer tape.
Repeat these steps with the other glass bottle.
STEP 4: ADD LIGHTS AND EMBELLISHMENTS TO BOTTLES
Next, we’re going to add the lights. I used wine bottle cork lights for this project. I found them here.
All you have to do is unwind them and then carefully thread them into the bottle.
The switch is on the back of the cork, so it’s super easy to turn them on and off.
Leave the cork out of the bottle while you add the leaves.
You’ll need to kind of fold them up so they’ll fit in the bottle.
Don’t worry, once they get past the neck, they should open back up. Add enough leaves so the bottle looks filled.
You can use a skewer or long stick to move the leaves around. I tried to push some leaves towards the outside of the bottle so they covered the wires as much as possible.
Once you’re happy with how the leaves look, you can thread the rest of the lights into the bottle and push the cork into place.
The last thing we need to do is dress up the top of the bottle with some fall embellishments. I wrapped some twine around the neck several times and used hot glue to hold it in place.
Then, I glued on a few fall items to finish off the bottles.
And that’s all there is to it – these lighted glass bottles are finished.
What a pretty decoration for fall!
Want to make your own? Get the free cut file for this project in the resource library


