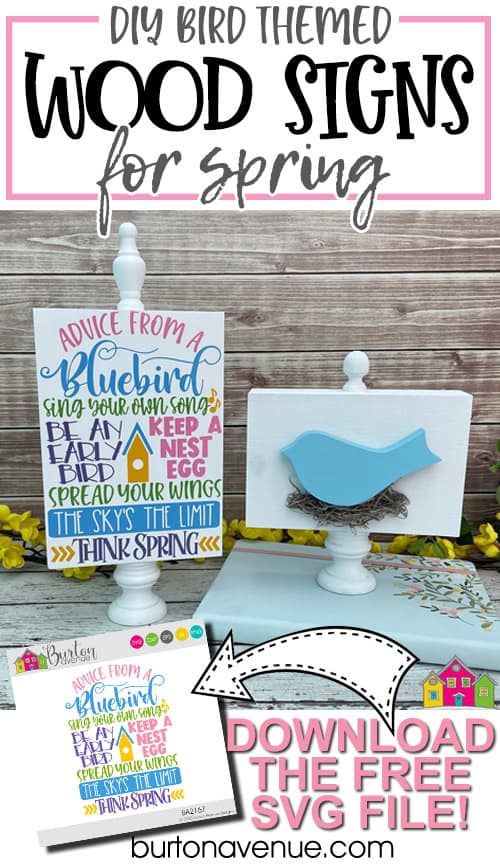
Today, I’m showing you how to make these bird-themed wood signs. They turned out so cute! Don’t you just love those little wood finials? They are the perfect touch and make these blocks look so custom. This is a fun project to make with your Silhouette or Cricut and I’m excited to show you how to make your own. Read on for the full tutorial.

HERE’S WHAT YOU NEED
- Wood for Signs (See step 3 for details)
- Adhesive Vinyl in Spring Colors (I got mine here)
- MDF Bird Cutout
- Transfer Tape
- Weeding Tool
- Scraper
- White Paint and a Brush
- Wood Glue
- Hot Glue Gun and Glue
- Spanish Moss
- Electronic cutter (Cricut Explore & Maker Machines, Silhouette Machines, or many other digital cutters)
- Cut File – Advice from a Bluebird BA2167 (click here to get the SVG file for free from my free SVG Library)
HERE’S WHAT YOU DO
STEP 1: DOWNLOAD THE FREE SVG FILE
The first thing you’ll need to do is get the free SVG file you’ll use for this project. I keep all the SVG files I use for the projects I make in my SVG Library. These SVG files work with Cricut and Silhouette machines, as well as many others. This library is open to everyone and is free! You can access the library here. Look for the file called Advice from a Bluebird BA2167. It will be listed under the Spring Category.
STEP 2: CUT AND WEED VINYL DESIGN
Open the design in your software program and resize it to fit your piece of wood. My wood measures about 5″ x 7″, so I resized the design to be about 4.75″ wide.
You can add registration marks to the design to make layering easy.
Do you need help adding registration marks? Be sure to check out these tutorials.
How to add registration marks in Design Space
How to add registration marks in Silhouette Studio
When everything has been sized correctly, you can cut the designs with your Cricut or Silhouette.
Remove the vinyl from your cutting mat and trim off any unused vinyl. Weed away the excess vinyl from around the designs.

Use the weeding tool to help remove the excess vinyl from inside the letters and shapes. Make sure the registration marks stay in place. Weed all 5 colors of vinyl.

Cut a piece of transfer tape a little larger than the entire design and place it sticky-side up on your surface. Then place one of the layers on top (for this design, it doesn’t matter which layer you do first).
![]()
Rub over the design firmly with your scraper tool.

Flip over the vinyl and pull off the backing.

Then, replace the backing, but leave the registration marks exposed.

Now, place that layer of vinyl over another color of vinyl and line up the registration marks. Press the two sets of marks together.

Remove the vinyl backing from the first layer.

Use your scraper to press both layers together.

Repeat those steps until you’ve layered all the colors of vinyl.

If the backing from the last layer doesn’t cover all the vinyl, use one of your larger backing pieces to protect the vinyl until we finish the project. Cut off the registration marks.

STEP 3: PAINT THE WOOD PIECES
Next, we’re going to work on the wood pieces.
For the vertical sign, I used a Candle Cup, a Large Finial, and a 5×7 Vertical Block with a hole.
For the horizontal sign, I used a Candle Cup, a Medium Finial, and a 4×6 Horizontal Block with a hole. I also used an MDF bird to attach to the horizontal sign.
I got these supplies at a local craft shop. You can also make similar-looking signs with this wood finial set, a 4×6 wood block, & 5×7 wood block.

Apply some wood glue to the finial and push it in the hole at the top of the wood block. Then, glue the candle cup onto the bottom of the block and make sure it’s centered

After the glue has had plenty of time to dry, it’s time to start painting. We’re going to paint both of the signs white.

You’ll need to do at least two coats to get good coverage. You’ll also want to paint the little wooden bird blue.

STEP 4: FINISH THE SIGNS
Once the paint has dried completely, it’s time to add the vinyl lettering. Grab the vinyl design and pull off the vinyl backing.

Position the vinyl on the sign and center it.

Rub over the design with the scraper.

Then pull off the transfer tape.
![]()
Add some glue to the back of the wooden bird and glue it onto the sign.

To create the look of a nest, roll up some Spanish moss between your hands.

Use hot glue to attach it to the sign right under the bird.

And that’s the last step, this project is finished. Didn’t these signs turn out so cute?

Did you enjoy this post? Help spread the word! Share this post on your favorite Pinterest board. Thanks!
Want to make your own? Get the free cut file for this project in the resource library

Your ideas are always so cute!! I just love your files!