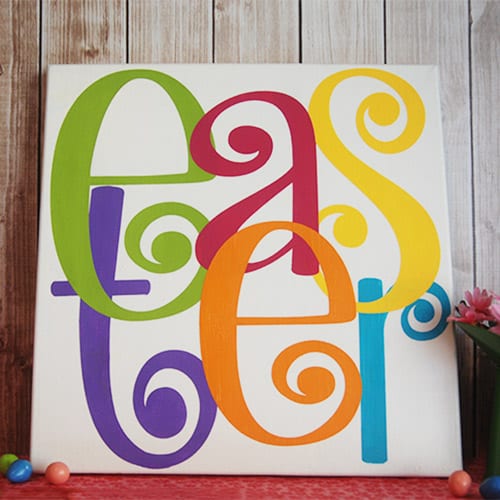
I don’t really have many decorations for Easter, so I thought I’d put together something that was super easy to make. I created this easy Easter sign on a plain white canvas and today I’d like to show you how to make it.
This post contains affiliate links for your convenience (which means if you make a purchase after clicking a link I will earn a small commission but it won’t cost you a penny more)! Read my full disclosure policy.
HERE’S WHAT YOU NEED
-
- Canvas (mine is 12″ x 12″)
-
- Vinyl (for stencil)
-
- Mod Podge (Optional)
-
- Paint (I used acrylic paints)
-
- Paintbrushes
-
- Electronic cutter (cricut explore, silhouette or other cutter)
- Cut File (available for free in my resource library)
HERE’S WHAT YOU DO
Apply 1-2 layers of Mod Podge (you can also use paint that is the color of your background) to your canvas. This helps the vinyl stencil stick better and prevents bleeding.
Use your Silhouette, Cricut, or electronic cutter to cut out your vinyl stencil. I made four different stencils for this project. You could do less depending on how you want the layers to look. Weed away the excess vinyl and apply the transfer tape.
Apply the bottom vinyl stencil to your canvas. Go around all the letters and press down with your fingers to make sure you get a tight seal.

Paint one or two light coats of paint on each letter.

After the paint is dry, remove the vinyl stencil from the canvas.

Apply the next layer of letters. Paint and allow time to dry. Repeat until all your letters have been painted.

(Optional) Apply one more coat of Mod Podge over the entire canvas for a protective finish.


Did you enjoy this post? Help spread the word! Share this post on your favorite Pinterest board. Thanks!
This is so cute and looks easy too!
We would love for you to come and link up with us at Your Designs This Time, Mondays 8:00amEST.
http://elizabethjoandesigns.com/2014/04/desings-time-no-5