HERE’S WHAT YOU NEED
- 2 Wood Blocks (I used 2×4’s and 2×6’s-large is approx. 5.5″ x 5.5″ and small is approx. 3.5″ x 3.5″)
- Wood Finial Set
- Wood Glue
- Paint and Brushes (I used white, red, and black acrylic paint)
- Sand Paper
- Vinyl (Color Doesn’t Matter)
- Transfer Tape
- Application Tool
- Transfer Tape
- Weeding Tool
- Electronic cutter (cricut explore, silhouette or other cutter)
- Cut File (available for free in my resource library)
HERE’S WHAT YOU DO
STEP 1: DOWNLOAD THE FREE SVG FILE
The first thing you’ll need to do is get the free SVG file you’ll use for this project. I keep all the SVG files I use for the projects I make in my SVG Library. These SVG files work with Cricut and Silhouette machines, as well as many others. This library is open to everyone and is free! You can access the library here. Look for the file called Love with Arrows. It will either be listed under the most recent projects/cut files or under the Valentine’s Day category.
STEP 2: PREPARE WOODEN BLOCKS
Sand the wooden blocks so they are nice and smooth. Apply some wood glue to the wooden finials and glue them into place. I found the cute finials on Amazon, but you could probably find them at your local craft store.

Allow the glue to dry for about 30 minutes. Paint the large block white. You’ll probably need to do 2-3 coats of each color to get complete coverage.

Paint the small block black. Once again, you’ll probably need a couple of coats.

STEP 3: PREPARE THE VINYL DESIGN
While the paint is drying, let’s get the vinyl ready. Open the design in your software program and size the design to fit your project. You might need to ungroup before you can resize the different parts of the design. The smaller piece of wood is about 3.5″, so I sized the single heart to be 3″ wide. The larger piece of wood is about 5.5″, so I sized the rest of the design to 4.5″. Then, I added a 5.5″ square around the design to create a stencil.
Do you need more help with creating a vinyl stencil? Check out these posts.
How to Make a Vinyl in Cricut Design Space.
How to Make a Vinyl Stencil in Silhouette Studio
I used Oracal 631 for the stencil, but you can also use Stencil Vinyl.
When everything is sized correctly, you can cut the stencil with your Cricut or Silhouette. Once it has finished cutting, weed away the excess vinyl.

Use a weeding tool to pull out the small pieces inside the heart.

The pieces inside that little heart are tiny, you might lose a few as you are weeding. Just save as many as you can.

Cut a piece of transfer tape a little larger than the design and place it over the vinyl designs.
![]()
Rub over the top of the designs with a scraper.

Then, trim off the excess transfer tape and cut apart the individual designs.

STEP 4: STENCIL THE WOODEN BLOCKS
After the paint on the blocks is dry, it’s time to apply the vinyl design. Flip the design over and pull off the vinyl backing.

Center the design over the wood and press into place.

Rub over the design with a scraper to help it stick to the wood.

Then, pull off the transfer tape.
![]()
Rub over the design one last time. Now, repeat these steps with the heart on the small block.

Paint the large block with one more coat of white paint and the small block with black paint. This is to help prevent bleeds.

Once the paint is dry, fill in the stencil on the large block. Paint the arrows and letters black.

Then, fill in the heart on the large block with red paint. Next, paint the front of the black block red. Once the paint is dry, repeat 2-3 times, until you can’t see the base coat of paint.

When the paint is dry to the touch, carefully pull off the vinyl.

Use a weeding tool to pull out the small pieces.

STEP 5: DISTRESS THE BLOCKS
To give the blocks a bit of a distressed look, lightly sand the edges of the blocks. You want to sand off enough of the paint that you start to see some of the natural wood peek through.


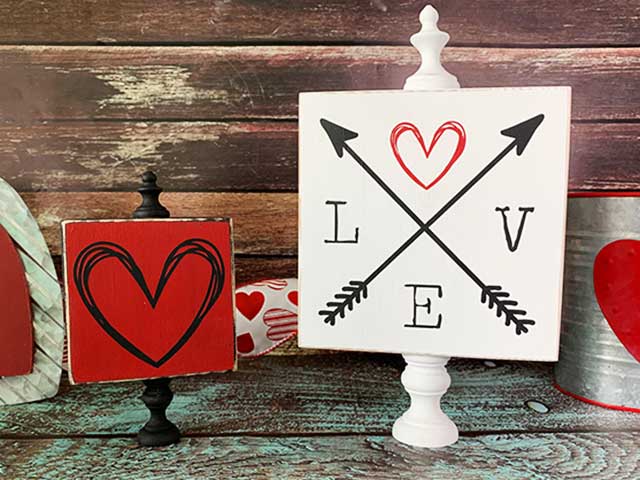
And that’s all there is to it! Such a cute decoration for Valentine’s Day!


Thank you!