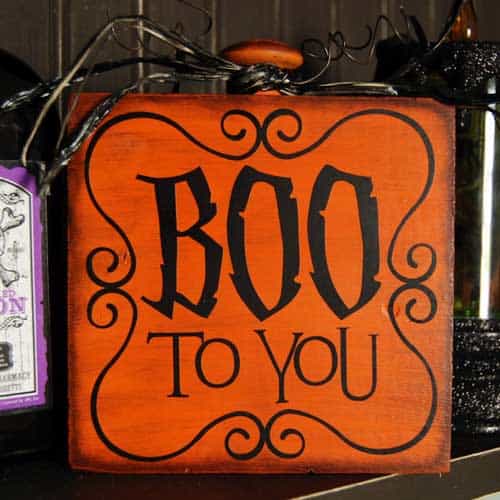
I love projects that are quick, I love them even more when I can make them with supplies I already have. This cute Halloween project was super easy and I already had everything I needed on hand.
This post contains affiliate links for your convenience (which means if you make a purchase after clicking a link I will earn a small commission but it won’t cost you a penny more)! Read my full disclosure policy.
HERE’S WHAT YOU NEED
- Wood Block (Mine is approx. 5.5″ x 5.5″)
- Wood Cabinet Knob
- E6000 Glue
- Orange Paint & Paint Brush
- Black Ink Pad
- Black Raffia (You could also use a cute Halloween Ribbon)
- Black Craft Wire
- Spray Sealer
- Black Vinyl
- Transfer Tape
- Electronic cutter (cricut explore, silhouette or other cutter)
- Cut File (available for free in my resource library)
HERE’S WHAT YOU DO
Start by using your E600 to glue the wood knob onto your wood block. Once that has dried, paint everything orange.
To distress the block, take a black ink pad and rub it over the edges and lightly. Also, carefully rub it over the knob and the middle of the block. If you’ve never used an ink pad to distress before, I would suggest practicing on a piece of scrapbook or cardstock. Once you’ve got the feel for the look you want, then apply the ink to your wood block.
Once you’re happy with your distressing job, take the spray sealer and spray everything with a nice even coat. This will stop the ink from smudging when you touch it.

While the sealer is drying, cut out your vinyl with your electronic cutter. I sized the design at 5″ x 5″. Then, weed away the excess vinyl and use transfer tape to apply the vinyl to your wood block.
Cut a piece of wire and wrap it around a pencil to give it that cute curly-q look. Then, twist it around the wood knob. Finally, cut a few pieces of black raffia and tie them around the knob, too.

So quick and simple to make!


Such a cute Halloween idea! Love this 🙂 Great job!
– Gina, (visiting from impeccablyimperfectlife.blogspot.com)
Love this little Halloween project!!! It fits in really well with the rest of your decor:)
Love this little Halloween project!!! It fits in really well with the rest of your decor:)
I've got everything I need to whip this up. I finished making the Halloween road sign yesterday. It turned out fabulously! Thank you! Instead of nailing the signs to the post, I used magnets so I could remove them for easier storing after the holiday.
SO cute!!! Love this! Your Halloween decor is so fun.
I featured you on my blog today, come over and check it out: http://www.artsyfartsymama.com/2012/10/pinteresting-features-n-shtuff-52.html
Cute!
What a cute idea! You come up with such great projects, I love reading your blog 🙂
Katie
http://www.funhomethings.com
Gosh this is so cute!
This turned out so cute, thanks for sharing!
Such a cute project! How did you do the letters?
Beautifully painted and cute! So cute in fact, that I'd like to invite you to come link it up with us at the party I just opened this morning…… http://www.finecraftguild.com/party-35/ (or choose the Halloween party instead)
Very cute!
This is super cute! I came from delicate construction and I hope you would follow me back, I am a new follower!
Jenn
couponcalimom.blogspot.com
so cute Angie!
Thanks for linking up! I featured your post in my wrap up http://tidymom.net/2012/halloween-projects/
Have a great rest of the weekend!
Cute block! Perfect addition for the Halloween decor!